Showing posts with label pie. Show all posts

Friday, 17 April 2015

A Pie In Wonderland

Fruit pies are my favourite at the moment! Honestly, I realized that I have never really had a 'to-go' recipe. If I want to surprise someone, I bake a cake, you know, with multiple layers and frosting and stuff, but let's be honest, that's not really the "we need something right now" category. Of course I am far from professional, and I'm sure that other hobby-bakers have much more experience with cakes, but I dare to say that most of us (the hobby-bakers) don't have 3 identical springforms. We have one each. Take it out, wash, re-grease, put another third of the batter, that'show it goes.
Six hours later (that's my normal time) we have the prettiest cake and the ugliest kitchen in the world, but of course we get the 'ho and has', so of course it was worth it.


But now I'm talking about the times when we don't have a day in the kitchen, we don't want the oven go for hours and we want something very pretty to finally prove to the grumpy auntie that we are over the mac'n'cheese phase. (I actually don't have any of those. The grumpy aunties I mean.)


What looks a bit tricky but also impressive on the pie is the lattice on the top. Well, I had multiple attempts on making it one down-one up, but no success. The problem was that I was trying to put the stripes of dough directly on the filling, so basically what was put there, stayed forever. Since then, I realised (oookay, I've seen in the Bake Off, are you happy?!) that it's better to do it in advance, on a sheet of baking paper, then carefully slip it on the pie.
Slip it, yeah. Well, those who are not chickens like me, go ahead and slip it (you basically release the lattice from the baking paper starting at one side of the pie), I will flip.


Yeah I know, flipping sounds a million times more risky. I honestly think I'm doing it because it's quick and I normally mess up things with overstressing and doing it too slowly. With a flip, you take a deep breath and do it. So what I basically do is that I press the dough-stripes slightly onto the baking paper, then hold the thing up with one palm, with the other palm on top of the lattice, flip it above the pie and quickly remove my hand. It is actually a lot easier than how it sounds.
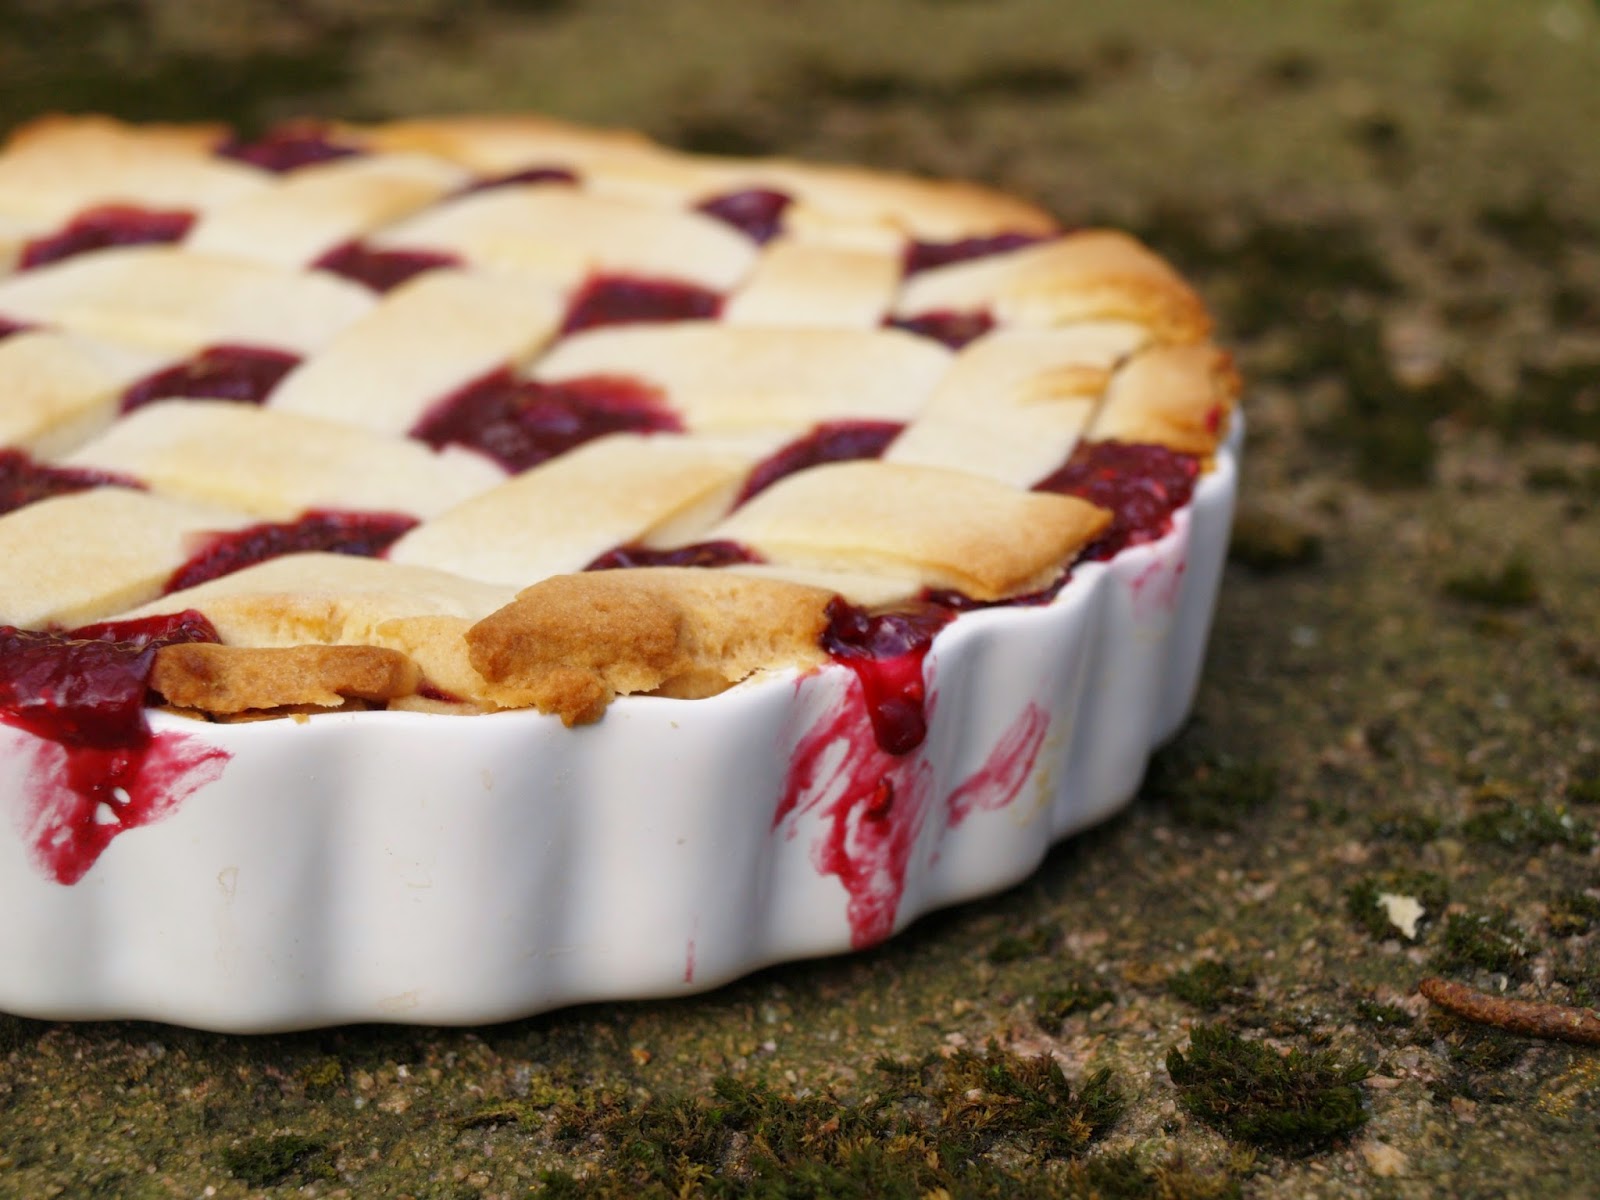

I actually sort-of made this pie before, with mulberries. It's the same idea, but different fruit and a more classic pie crust.

On the photos, you can see a mini pie, but here I'm giving the recipe for the big one, as it is more likely you gonna use that. If you want to make half the size as I did, half the measurements.

Crust
300 g all purpose flour
200 g butter
100 icing sugar
a splash of ice water

Filling
500 g of fresh or frozen berries
35 g custard powder (I used vanilla flavour)
1 tblsp cornflour
70 g caster sugar
1 dl water

Sift the flour and icing sugar together. Rub the butter into the flour with your hands. When it's all crumbly, add a splash of ice water and as quickly as possible, form it into a dough. Put it in the fridge for 20 minutes. Preheat the oven for 175 C.
In a saucepan, slowly bring the fruit and sugar into a boil, and incorporate the custard powder and cornflour with the water. Add this into the fruit mixture after it's been cooking for five minutes. Constantly stirring, simmer until it thickens up (around 5 minutes). Set aside.

Divide the dough into two parts, leaving one slightly bigger than the other. Roll out the bigger part into a circle and place it into your pie case. Even the edges and make some nice patterns on the side with a fork.
Put a sheet of baking paper on the raw dough, and put some baking beans or rice on it. Put into the oven. After eight minutes, remove the beans/rice and put the case back in the oven for another 5 minutes. Until it bakes, prepare the lattice for the top of the pie on a baking sheet. For a nicer outcome, use a pizza cutter.
When the case is baked, put the filling in it, then flip/slip the lattice as well. Bake for 25 minutes or until the filling starts to act like lava! That's what happened with my one, that's why it looks so messy.

For serving, wait until it's cooled down.


Monday, 15 September 2014

Celebrating Autumn - Caramel Apple Tart


I had to live 21 years to decide which season was my favourite. Autumn won. Lot of people go for spring, but that's the season I particularly don't like. It's the end of the winter, but still SO cold for several weeks, then you just can't tell whether it's gonna be hot or chilly that day. With Autumn, it's different - it's cold. Maybe there is a little bit of sunshine, but still cold. Festive season is coming, or is already here, the colours are amazing, and there is rain. My favourite type of weather. I just adore the smell of wet fallen leaves in the park, when it's still not freezing, but you already got red cheeks. Oh my.
And as a baker, this is the best season EVER. Baking over the summer is such a pain, with heating up the already hot house and all that. During winter it is really lovely, but the rage of ingredients are wider during the autumn, so it is the best. And all these fruits and veggies - apples, pears, grapes, squash, nuts etc - are the best to combine with spices like cinnamon, nutmeg or ginger.


This tart is very simple but yet has a special kick with the bottom caramel layer. You can't exactly feel the caramer cracking, as it melts in the oven and merges with the apples, but it still has that lovely flavour what makes this tart stand out.
It takes quite a long time to grate the apples - if you don't have much time, just cut into small pieces.

Ingredients
Crust:
300 g all purpose flour
200 g butter
100 g icing sugar

Filling:
100 + 30 g caster sugar
5 middle size apples, peeled and grated
10 g butter
1 tsp cinnamon


Method
Mix the flour with the icing sugar. Cut the butter into tiny cubes, and add it to the flour mixture. Crumble the butter into the flour using your fingertips. Add some cold water to form a dough. Put it in the fridge for a little while.
Melt the butter in a pan, and add grated apple, cinammon and 30 g sugar. Cook until it losts half of its size,
Grease a normal tart form, and preheat the oven for 175 C. Separate the dough into two parts; it should be 1/3 and 2/3. Roll the bigger one and place it in the form. Place baking paper on the dough, then some baking beans or rice (these could not be used as beans or rice anymore so I suggest to keep them after baking for another time!). Bake for 10 minutes, then remove the beans and bake for an other 5 minutes.
While the crust is in the oven, separate the smaller dough, roll them and cut them into stripes.
When the crust is ready, put 100 g caster sugar into a pan and let it melt on medium heat. Do not mix until it all melted. When it is all melted, as quick as possible pour it onto the crust. It hardens very fast! Spread it as much as you can. Place the cooked apples on the caramel, then finish it with the dough stripes. Put it back into the oven for 15-20 minutes.


Wednesday, 2 July 2014

Mulberry custard pie

So, I found that mulberry tree near our house next to an old road. Then an other one, in a park. I immediately had the idea of this pie.
Anyway, mulberries are so amazing. Unfortunately, I don't find mulberry trees very often, and finding the fruit in a shop is absolutely impossible. So if you happen to run into one, definitely go and make this pie! It is so yummy with the creamy vanilla custard. And the whole feeling of going and collecting some wild fruit in a wee basket or bowl is so great, almost magical. I think it makes you appreciate the fruit, thinking that it is a true gift from nature, not something you bought. Okay, I'm starting to be too romantic, let's move on!
I gave up my favorite 3:2:1 recipe this time to try something new I read in a magazine. It was great, but kind of similar to my original one. 
If you can't get mulberries (but please try), you can make this pie with raspberries or blackberries as well.


 scroll down for printable recipe!


300 g flour
200 g butter
100 g icing sugar
1 egg yolk
1 tsp baking powder
1/4 tsp salt
1 tblsp lemon juice
1 tsp soured cream

350 g mulberries
70 g caster sugar
2 dl water
1 sachet custard powder (49 g)

Put the butter in the microwave for 30 seconds. Beat it with the icing sugar and egg yolk until pale. Add the flour, salt, lemon juice and baking powder, and mix together with a wooden spoon. Add the soured cream (you can use cream fraiche or yogurt if you want), and incorporate the mixture into a ball using your hand. Add more soured cream if necessary. Cover it with cling film and put it in the fridge for 20 minutes.
Mix the mulberries with the caster sugar and cook it on medium heat for 5 minutes. Mix the custard powder with water and add it to the berry mixture. Mix constantly with a wooden spoon until it gets thick (around 5 minutes). Set aside.
Preheat the oven for 180 C. Divide the crust ball into to parts, leaving one of them bigger (2/3 - 1/3). Roll the bigger one on a floured surface. Grease a pie chart (I used a 32 cm wide one) and place the rolled crust in it. Bake for 10 minutes. Pour the mulberry mixture on the crust. Roll the other part as well, and cut 1,5 cm wide stripes. Place them on the berry mixture and bake together for 20 more minutes.
If you can, wait until it cools down, and the filling sets. 


Monday, 17 March 2014

Cheese & onion pie + NEW DESIGN!


Wohoo, new design!
As you have seen, I created new widgets recently with a hand-draw shelf theme. I always ask my friend who's a graphic designer to give me feedback, and she suggested to create the whole layout of the blog like that, so I finally drew the header. I hope you like it! Let's celebrate with pie.


I love this cheese & onion pie since it is soooo easy to make, you don't need any special ingredients, and it is good as a starter, a main or even a side! The crust is my favourite quiche crust, which is so easy to remember - the flour has to be the double of the salted butter so if you use 100 g butter you need 200 g flour etc etc. So easy to remember, and you can always create new variations.
This was made for a small pie chart, if you have a classical one, use 300 g flour and 150 g butter. You also have to cover it, don't forget!


Cheese & onion pie (for a 20 cm pie chart)

200 g flour
100 g salted butter 
1 egg

1 giant leek
100 g cheddar cheese
0,5 dl cream
salt, pepper
1 egg

Cut the butter into small pieces and using your fingertips, mix it with the flour. When it is crumby, add the egg and mix it together. If you don't have an egg, you can use 2 tblsp of water. Wrap it into folpack and put in the fridge for half an hour.
Cut the leek, and grate the cheese. Mix it together with the cream and egg, add salt and pepper (be careful - the crust is already salty!).

Butter the chart and preheat the oven (175 C) Half the dough, make the other half a bit bigger. Use 2/3 of this half to roll a circle for the bottom of the chart. Use the rest 1/3 for the sides. Put parchment paper and baking beans on it and bake for 5 minutes. Remove the paper and beans, and bake for an additional 5 minutes. Wait a little bit so it chills down, then spoon the leek and cheese mixture on it. Roll the other half of the dough, and place it on the top. If it is bigger than the chart, squeeze the edges between the mixture and the baked dough. Otherwise just squeeze it to the baked layer gently with a fork. You may "draw" some marks on top with a knife. Pierce the top dough so the air could come out.
Bake for 35 minutes. Always serve hot! You can heat it up again in the oven or in the microwave.


Sunday, 2 February 2014

Spicy squash pie


I made this pie for Thanksgiving but forgot that I actually made photos too. (...) Reviewing them I remember how good this pie was, so I will redo it very soon. During the autumn, I made many versions of squash pies but this one turned out to be the best. This is one of the variations of the classic pie I bake very often - it is kinda impossible to forget the recipe as it follows the 3:2:1 rule; 30 dkg flour, 20 dkg butter and 10 dkg sugar. Well, these amounts apply for a classic, big ceramic pie chart - which I do not have at the moment, so I used a small one, halving everything The pastry was still a bit more than I needed, you can see on the pictures how tall it is.
Happy baking!


Spicy squash pie (for a 30 cm pie chart)
30 dkg flour
20 dkg butter
10 dkg icing sugar
1 egg

1 small butternut squash
2 eggs
1 tbsp fresh ginger
1/2 tbsp cinnamon
1 dl cream

Mix the icing sugar with the flour. Chop the butter into tiny cubes and using your fingers, mix it together with the flour-sugar mixture. Add the egg and knead until smooth. Wrap in plastic foil and put in the fridge until the batter is ready.
If you have time, simply put the whole squash in the oven and bake on 180 C for about an hour or until it's soft. Then cut it into half, remove the seeds and simply spoon the inside into a bowl. You may cut the squash into half and remove the seeds, then cut into pieces before putting into the oven - in that case it will be ready quicker. Leave the oven on 180 C.
Once the soft, baked squash is a bit chilled, mix it with an electric food blender until smooth (I don't have one, and a fork worked as well). Add the cream, spices and eggs and mix with and electric hand mixer until smooth. 
Grease the pie chart, and using the 2/3 of the chilled dough, roll a circle and place it to the bottom. Use the remain of the dough for the sides. Gently squeeze the dough together everywhere. Place baking paper and baking beans/rice on the dough and bake for 10 minutes. Remove the paper and beans and bake for another 5 minutes. Pour the squash mixture into the dough and bake on 180 C for 35-40 minutes or until the middle is set. Serve it hot or cold.